Start by sketching simple shapes like an oval for the body and a smaller circle for the head, connecting them with a slight curve for the neck. Add basic wing and tail outlines using curved lines and ovals, then place the eyes and beak with gentle shapes aligned on the head.
Gradually layer feather sections on wings and tail, and shape legs with toes for balance. Focus on gentle strokes and light shading to capture form, and keep practicing to bring your bird drawings to life with more detailed anatomy and texture.
Understanding Basic Bird Anatomy and Structure
Bird anatomy forms the foundation for drawing birds accurately, and understanding their basic structure will make your sketches more lifelike. Start by visualizing the lightweight skeleton with hollow bones, designed for flight. It features a strong keel bone on the sternum that anchors powerful flight muscles.
Notice the body’s main divisions: head, neck, trunk, tail, wings, and legs. The spine varies in vertebrae count, with neck vertebrae being flexible and numerous.
Wings include key bones like the humerus and ulna, arranged to support different wing shapes. The major wing (remiges) feathers play a crucial role in flight, providing lift and maneuverability.
Legs are built on a fused pelvic girdle and include thigh and lower leg bones, ending in toes.
Recognizing this efficient, fused skeletal framework helps you capture the bird’s form and dynamic posture accurately.
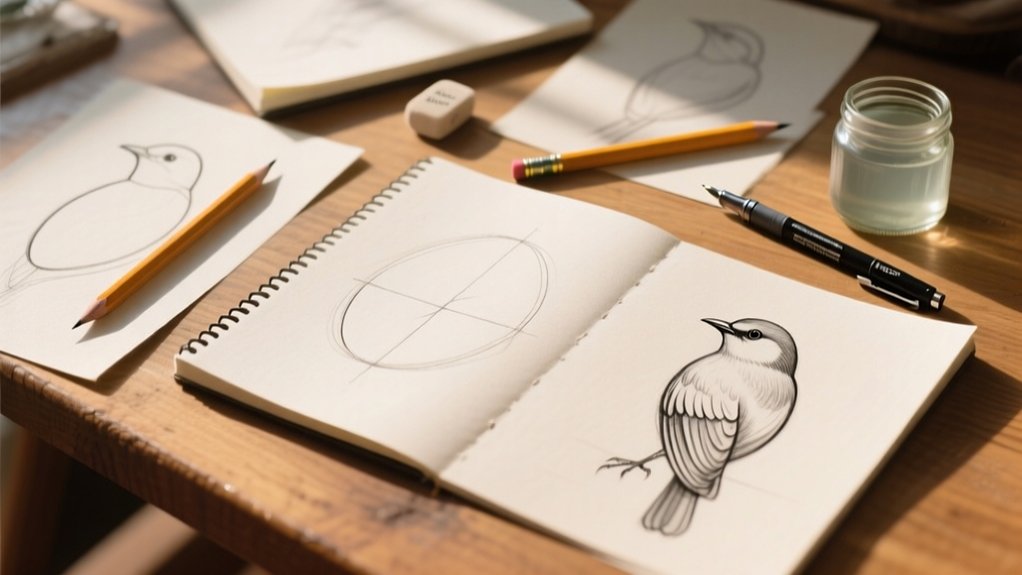
Sketching the Bird’s Basic Shapes
With a solid understanding of how a bird’s anatomy shapes its form, you can begin sketching by breaking down the complex figure into simple shapes.
Start with a slightly oval shape as the bird’s body, positioning a vertical line through its center to mark balance and foot placement.
Add a smaller circle just above and touching the body oval to represent the head, showing a slight neck curve where they connect.
Sketch two curved “S” shaped lines from the upper body for wings, and an irregular shape extending from the rear for the tail, making sure to extend it beyond the body for correct proportions. Extending wings using curved lines helps capture the natural motion of the bird in flight.
For legs, draw triangular shapes below the center line, using small tear-drop forms to outline toes.
These basic shapes create a strong foundation for your bird drawing.
Drawing the Head, Eyes, and Beak
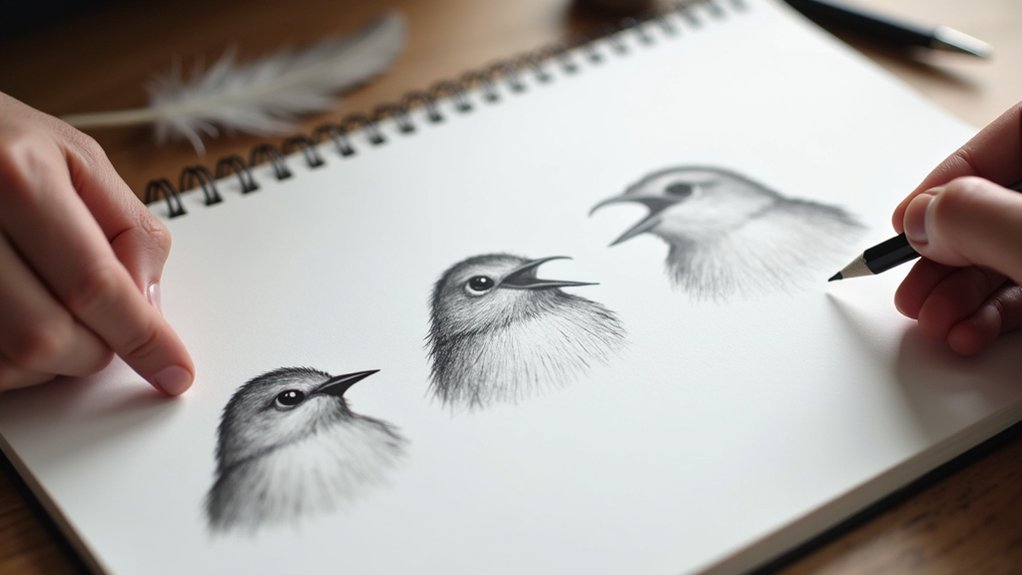
Start by placing a small circle to mark the eye along the eye-beak line. This little step really helps keep your bird’s gaze looking natural and expressive.
Next, shape the beak using a cone form that begins inside the head circle and lines up just right with the eye line. Doing this adds a touch of realism to your drawing. Remember that beak anatomy is complex and not directly attached to the skull, so referencing real birds will improve accuracy.
These steps give you a solid foundation to capture your bird’s unique character and posture.
Eye Placement Techniques
One key step in drawing a bird’s head is placing the eye accurately, as it sets the foundation for the entire facial structure. Start by sketching the head with intersecting ovals to capture curvature.
Position a small circle for the eye along the natural contours, aligning it with the imaginary eye-to-beak line. This placement reflects the bird’s gaze direction and maintains proper spacing from the beak, avoiding stiffness.
Focus on the eye’s shape, considering its bulging, unique structure, and plan where the orbital and feather rings will appear. Artists often emphasize the importance of detail, contrast, and crispness when drawing animal eyes to create a realistic effect. Accurate eye placement guarantees your drawing looks lively and anatomically correct.
| Step | Detail |
|---|---|
| Head Foundation | Use intersecting ovals |
| Eye Shape | Small circle, bulging form |
| Alignment | Eye-to-beak line |
| Spacing | Species-specific distance |
| Focal Point | Maximize detail, contrast |
Shaping the Beak
After placing the eye accurately, you’ll want to focus on shaping the beak, as it defines much of the bird’s character and function. Start by drawing a central axis line through the head, extending through the beak’s direction. Use a secondary eye-line below the eye for alignment.
Be aware that the beak’s shape varies with species. Observe the length from beak tip to eye and the width carefully. Sketch the upper and lower mandibles separately, noting their angles relative to the head.
Adjust your foundation lines based on the bird’s head rotation and viewing angle, remembering the beak curves along the central axis. In different views, foreshortening affects the appearance of the beak, so it may appear shorter when drawn in a 3/4 perspective.
Finally, refine your lines with gentle curves for a natural look, integrating feather edges where the beak meets the head to create a seamless shift.
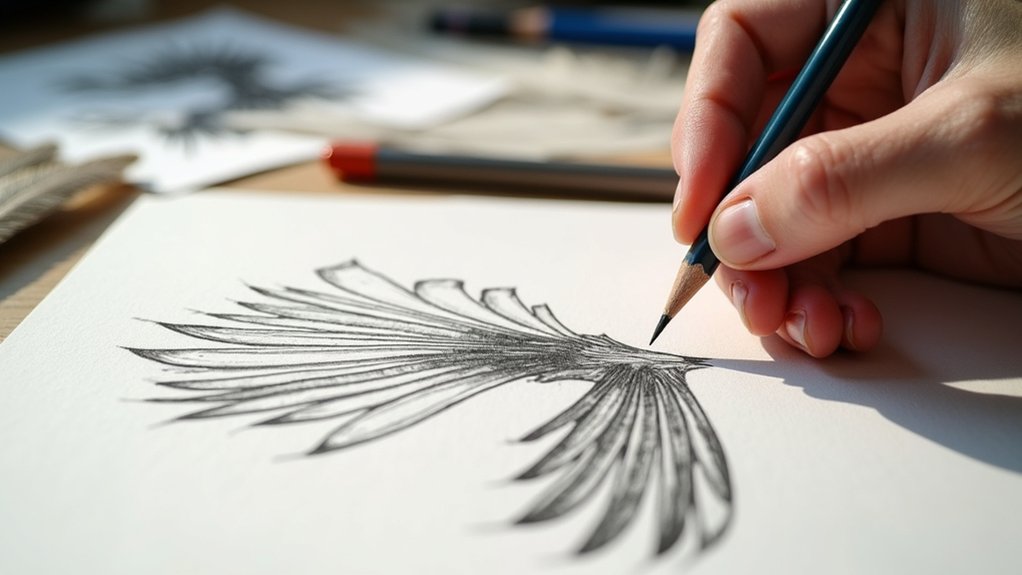
Outlining the Wings and Feather Layers
A well-defined outline of the wings and feather layers sets the foundation for a realistic bird drawing.
Begin by sketching the wing’s oval or curved shape, marking the upper arm-like structure and shoulder blade as your anatomical base.
Next, lightly outline the different feather sections: start with the smallest lesser coverts that overlap the entire wing, then add the greater coverts above the flight feathers.
Draw the secondary feathers in the middle section, followed by the longer primary feathers extending outward.
Remember, feathers radiate from the wing base and overlap each other, creating depth. Understanding the feathered wing structure helps in capturing the realistic layering and flow of the feathers.
Group feathers to suggest texture without detailing every line. This approach keeps your drawing accurate and manageable, setting you up perfectly for adding finer feather details later on.
Creating the Tail and Its Feather Arrangement
When you’re creating your bird’s tail, start by establishing a symmetrical shape as a foundation. Most tails balance feathers evenly on both sides, so this helps keep things looking natural.
Then, use layering techniques to overlap the feathers in a way that feels natural. Fan them outward from the center—that way, you get depth and realism. Tail feathers, or rectrices, usually have symmetrical vanes, contributing significantly to the tail’s shape and balance.
And don’t forget to vary the sizes and shapes of the feathers. That little detail really helps capture the unique patterns in a bird’s tail and brings your drawing to life.
Tail Shape Symmetry
Understanding tail shape symmetry is essential for accurately creating the tail and its feather arrangement in your bird drawing. Start by establishing a center line from the tail base to the tip; this guides the balanced placement of feathers. Position the two central tail feathers, or rectrices, on top as anchors, then fan the remaining feathers outward evenly on both sides. Make sure each feather pair mirrors in length and angle to reflect natural bilateral symmetry, vital for aerodynamic balance. Avoid asymmetry in your initial sketch. Paying attention to how beak types reflect evolutionary adaptations can also help you appreciate the importance of symmetry and structure elsewhere in a bird’s body, such as the tail. Symmetry improves visual balance and flight realism. Remember, the overlapping feather arrangement should show the middle feathers layered uppermost, with outer feathers progressively layering beneath, helping you convey the fan shape clearly and accurately. Observing real birds or photographs can help you grasp how these feathers naturally overlap and move, which is important for realistic feather arrangement. This structure sets a solid foundation for your bird’s tail.
Feather Layering Technique
Building on the balanced tail shape you’ve established, focus next on layering the feathers to bring your bird’s tail to life. Start by sketching a mid-tone base layer to set placement and proportions. This approach reflects the importance of feather arrangement in both artistic representation and real bird anatomy.
Then, arrange the feathers carefully:
- Position the central pair of tail feathers on top, forming the tail’s core. These tail feathers, known as rectrices, are crucial as they help birds brake and steer in flight, contributing to the tail’s functional structure rectrices function.
- Layer the outer feathers beneath, overlapping sequentially for natural depth.
- Use short, directional strokes following feather growth from base to tip.
- Add shading and darker edges to define each feather’s shape and create dimension.
Remember to include covert feathers layered above and below the main tail feathers to protect and add realism.
Keep your strokes consistent and observe your reference closely. This method builds texture and realistic feather arrangement without losing form.
Tail Feather Variations
As you create the tail and arrange its feathers, you’ll want to pay close attention to the unique variations in tail feather structure and placement that give each bird its characteristic shape and function. Tail feathers, called rectrices, usually appear in six symmetrical pairs fanning out from the central tailbone.
Outer feathers are longer and more asymmetrical, forming a notched edge that improves flight control. Use a centerline to maintain balance, and sketch feather layers with gentle curves to suggest flexibility.
| Feature | Description |
|---|---|
| Central Feathers | Shorter, symmetrical, minimal asymmetry |
| Outer Feathers | Longer, asymmetrical, aerodynamic |
| Arrangement | Fan-shaped, symmetrical pairs |
| Function | Steering, balance, showcase |
This approach guarantees your bird’s tail looks both natural and dynamic.
Designing Legs and Feet With Proper Proportions
When you design bird legs and feet, keeping their unique anatomy and proportions in mind is crucial for capturing realistic poses.
Remember, birds walk on their toes, not full feet, so the tarsometatarsus forms an extended foot area, and the actual “knee” is hidden.
Focus on these key points:
- Draw the leg bending backward at the ankle, not the knee, to position the center of gravity correctly.
- Sketch the thigh close to the body; it rarely moves far from the torso.
- Position three forward toes wrapping around a branch or ground, with a single backward toe providing balance.
- Render the back toe straight with a hooked claw, while front toes curve naturally.
This approach guarantees your bird’s legs and feet look balanced and lifelike. Understanding the unique bird anatomy of legs and feet enhances your ability to depict natural bird postures accurately.
Refining Details and Adding Feather Patterns
Although capturing every tiny feather might seem overwhelming, focusing on refining details and adding feather patterns will bring your bird drawing to life. Follow feather direction carefully. Strokes should mimic growth from body to tip, creating natural texture. Make sure to observe the light source closely to accurately capture the values that define the bird’s form.
Use light layers first, then build shadows to add depth. Remember, suggest feather groups rather than drawing each one precisely for a lively, realistic look.
| Feather Section | Stroke Direction | Shading Tip |
|---|---|---|
| Primary | Toward tail | Dark shadows between feathers |
| Secondary | Overlapping, layered | Gradual value layering |
| Tertiary | Closer to body, layered | Shadow under wings |
| Facial Feathers | Point toward beak | Short, directional strokes |
This technique improves dimension and keeps your drawing energetic and believable.
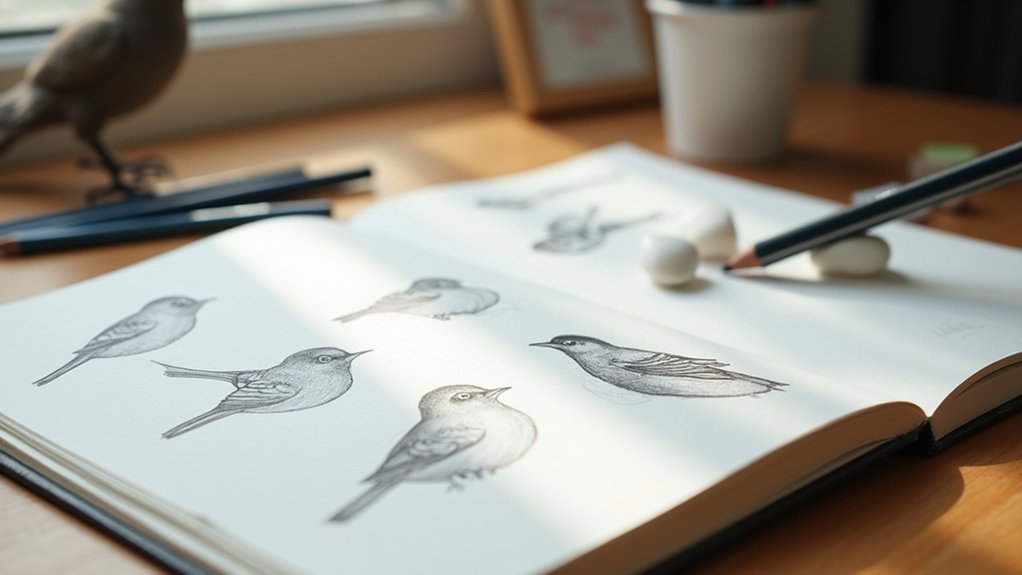
Tips for Drawing Birds From Life or Photos
How do you choose between drawing birds from life or using photographs as references? Both have unique benefits.
Photos let you study birds in detail, capturing clear poses and features without time pressure. Observing live birds deepens your connection and teaches you about movement and behavior, though it demands quick sketching skills. Warm up with gesture drawings to improve your ability to capture birds in motion quickly.
Here are tips to get the most from each method:
- Use multiple photos to view birds from various angles and positions.
- Practice quick sketches outdoors, focusing on general shapes and proportions.
- Employ binoculars to catch distant details and observe subtle behaviors.
- Begin with photo studies, then challenge yourself with live sketching to build speed and memory.
Balancing both approaches boosts your skill and understanding effectively.
Frequently Asked Question
What Type of Paper and Pencils Are Best for Bird Drawing?
You’ll want to choose drawing paper for your bird sketches since it offers better surface quality than regular printer paper.
If you’re on a budget, white photocopy paper works fine to start.
For pencils, grab an HB as your basic choice, plus a range of sizes to create varied line weights and details.
Mechanical pencils save time by skipping sharpening, and adding charcoal pencils can help you investigate different tonal effects.
How Can I Prevent Smudging While Shading Feathers?
You want crisp feather details, not smudged shadows. To prevent smudging, place scrap paper under your hand and shift it regularly as you work.
Use light pressure with your pencil, applying gradual layers instead of heavy strokes. Hold your pencil on its side for controlled shading, and test on scrap paper first.
After finishing, spray a fixative lightly to lock in your shading without risking smudges.
Stay patient and steady!
Are There Digital Tools Recommended for Bird Illustration Beginners?
Yes, you’ll find digital tools like IBIS Paint X perfect for beginners because it offers step-by-step tutorials and an easy interface.
Procreate is great if you have an iPad and Apple Pencil; its blending and feather brush packs really help with realistic details.
Adobe Illustrator suits you if you want vector precision and professional features.
All these tools support layering and custom brushes, so you can experiment without fear and build your skills confidently.
How Long Does It Typically Take to Complete a Bird Drawing?
You’ll spend anywhere from 30 seconds to a couple of hours drawing a bird, depending on your goal.
You might do quick gesture sketches in under five minutes, create intermediate pencil or charcoal drawings in about 30 to 45 minutes, or invest over an hour on detailed, textured renderings.
Your experience, chosen medium, and the bird’s complexity will influence your timing.
Start simple, practice regularly, and watch your speed and skill grow!
Can I Use Photographs I Took Myself for Reference Legally?
Yes, you can definitely use photographs you took yourself for reference legally.
Since you own the copyright to your own photos, you have full rights to use them however you want, including drawing, painting, or creating derivative artworks.
You don’t need permission or licensing, and your creative works based on your photos are protected.
This legal ownership gives you freedom and control to create without worrying about copyright issues.
Keep enjoying your creative process confidently!
Conclusion
Just like a bird learning to fly, your drawing skills take practice and patience. By understanding each part, from the gentle curve of the beak to the intricate feathers, you’re not just sketching; you’re bringing life to your paper.
Keep observing, keep sketching, and soon your birds will soar off the page with confidence. Remember, every great artist started with simple shapes, just like you’re doing now.
Keep flying forward!