First, identify if birds are in your vents by checking for sounds or visible nests. Next, seal all entry points with durable materials to prevent more birds from getting in.
Then, safely remove nests only when no birds or eggs are present, using gloves and masks. Install exclusion devices like mesh or one-way doors to keep them out.
Finally, monitor your vents regularly to maintain a bird-free home. Keep going to find detailed steps and tips for success.
Identify and Confirm Bird Activity in Vents
To identify and confirm bird activity in your vents, start by inspecting the exterior for signs like droppings or nesting materials near vent openings.
Look closely for any bird activity, especially during early morning or late evening when birds are most active.
Use a flashlight to inspect vents for nesting materials, but avoid disturbing any birds or active nests.
Listen for chirping sounds, particularly in spring and summer, as these indicate baby birds may be inside.
Check for blocked airflow, which often signals a bird problem caused by accumulated debris or nests.
Once you confirm birds are present, plan how to safely remove the nest.
This careful inspection helps you address the issue effectively while minimizing harm to the birds and protecting your home’s ventilation system.
Seal All Entry Points to Prevent Further Access
Although removing birds from your vents is crucial, sealing all entry points is necessary to prevent them from coming back.
Begin by thoroughly inspecting your home’s exterior, focusing on vents, eaves, chimneys, soffit vents, and fascia boards for gaps or damage that serve as entry points.
Use durable materials like hardware cloth, caulking, or expanding foam to seal these openings effectively.
Implement bird control exclusion methods by installing proper vents and screens to maintain airflow while blocking birds.
Regularly inspect and maintain these sealed areas, especially around pipes, to guarantee ongoing protection.
Seasonal inspections help you identify new vulnerabilities early, keeping your home secure.
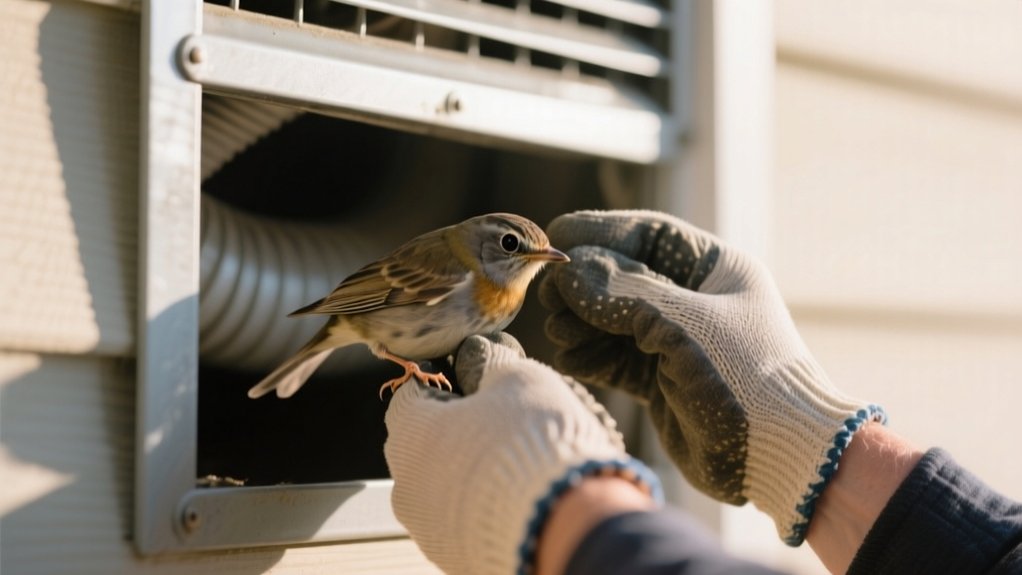
Safely Remove Nests and Relocate Birds

Before removing any nests, make sure there are no eggs or chicks inside. Disturbing them can cause legal problems and abandonment by the parent birds.
To safely remove and relocate the birds, first identify the bird species. Some birds are protected and require permits. Use humane control methods like one-way doors to let birds exit without re-entry, making sure no young are trapped inside.
Wear gloves and a mask when handling the old nest to avoid exposure to contaminants.
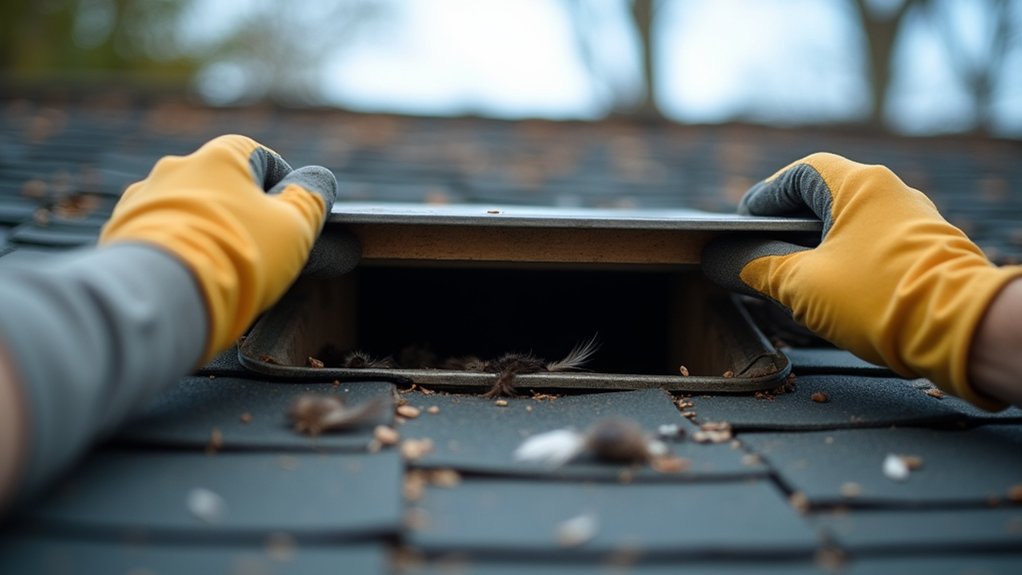
Once the birds have left, carefully remove the old nest. Then clean and sanitize the area thoroughly to eliminate pathogens and discourage future nesting.
It’s also wise to inspect the area regularly after removal to ensure birds don’t return and to spot any signs of new nesting activity early.
Following these steps helps you safely remove nests and relocate birds without harming them or breaking local wildlife regulations.
Install Exclusion Devices to Keep Birds Out
Once you’ve safely removed nests and relocated birds, preventing them from returning becomes your next priority.
Install exclusion devices such as bird wire mesh over vent entrances to allow airflow while blocking re-entry.
Fit one-way doors to let birds exit but not come back, ensuring no chicks remain trapped.
Add bird spikes along ledges near vents to deter perching and nesting.
For durable protection, consider UV-resistant netting that withstands weather and keeps birds out long-term.
These exclusion devices create physical barriers that effectively prevent birds from accessing vent areas.
Exclusion devices form strong physical barriers that keep birds out of vent openings effectively.
Make sure to choose materials suited for your environment, and install them securely for maximum effectiveness.
This proactive approach safeguards your vents from future bird infestations and damage.
Monitor and Maintain Vent Areas Regularly

Since birds can quickly return or find new entry points, you should monitor vent areas regularly for signs of activity like droppings, nesting materials, or chirping. Maintaining cleanliness around vents helps deter nesting.
Schedule inspections at least twice a year to verify seals remain intact and no new gaps appear. Documenting bird activity and maintenance helps track issues and plan further actions.
| Task | Frequency | Purpose |
|---|---|---|
| Inspect vent areas | Twice a year | Detect bird activity early |
| Clean surrounding | Regularly | Deter birds from nesting |
| Repair seals | As needed | Maintain secure vent barriers |
Frequently Asked Question
What Types of Birds Are Most Likely to Nest in Vents?
You’ll most often find starlings, house sparrows, pigeons, chimney swifts, and woodpeckers nesting in vents.
These birds prefer enclosed, sheltered spaces for protection, making vents ideal.
Starlings, in particular, build messy nests with twigs and debris, while chimney swifts cling to vertical surfaces inside chimneys or vents.
If you notice nesting materials, droppings, or chirping sounds from your vents, these species are likely the culprits you need to address.
Are There Any Legal Restrictions on Removing Birds From Vents?
You can’t just grab a medieval sword and chase birds from your vents without considering the law.
You’re protected by the Migratory Bird Treaty Act, which makes disturbing nests with eggs or chicks illegal without permits.
Local rules vary, so check them first.
To stay compliant, consult wildlife authorities or hire professionals. They’ll remove birds humanely and legally, saving you from fines or legal trouble.
Can Bird Droppings in Vents Cause Health Problems?
Yes, bird droppings in vents can cause serious health problems.
When dried, droppings release spores that may lead to respiratory diseases like histoplasmosis.
They also harbor bacteria, fungi, ticks, and mites that risk your health and your pets’.
To protect yourself, you should regularly clean and disinfect vents, and handle droppings carefully using protective gear.
This reduces contamination and improves indoor air quality.
How Can I Tell if Birds Have Damaged My Vent System?
You can tell if birds have damaged your vent system by inspecting for physical signs like torn vent covers, nesting materials, or blockages reducing airflow.
Listen for unusual noises like chirping or rustling inside vents.
Also, check for bad odors indicating decomposing matter.
Don’t just assume damage; closely examine your vents regularly to catch issues early and prevent costly repairs or health risks from bird droppings and debris buildup.
What Seasonal Timing Is Best for Vent Maintenance to Avoid Birds?
You should schedule vent maintenance in late summer to early fall, around mid-September, after most birds finish nesting.
Also, inspect vents in spring to catch early signs of bird activity and prevent nests.
Regular checks twice a year, especially in late winter and late summer, help you stay ahead.
Installing physical barriers before March guarantees birds can’t enter during peak nesting.
Seasonal cleaning after fall and winter keeps vents secure and debris-free.
Conclusion
By following these five simple steps, you’ll quickly turn your vents from a bird’s cozy hideaway into a secure, bird-free zone. Think of your vents as a fortress. Once you seal entry points, remove nests, and install exclusion devices, you’ll keep unwanted guests out for good.
Regular monitoring guarantees your efforts hold strong. Stay proactive, and you’ll protect your home while keeping those feathered intruders at bay with ease.